Over The Top Mommy

DIY

DIY Holiday Thank You Cards Using Behr Paint Chips!

With the holiday season coming to a close, I can look back and smile, just thinking about some of the new Christmas memories our family made together this year. As we were putting away the ornaments and our Christmas tree, I looked at the huge pile of opened gifts near the fireplace and it realized that someone’s got  quite a few thank you notes to write now. I thought it would be fun for her thank you notes to have a homemade touch and to be handwritten because I think people appreciate those kinds of things.

I was recently inspired by one of my favorite crafting Superwomen, Laura Kelly! She did a tutorial post showing how to make simple and adorable Christmas tree ornaments using paint chips.

Paint-Chip-Trees-With-Lights
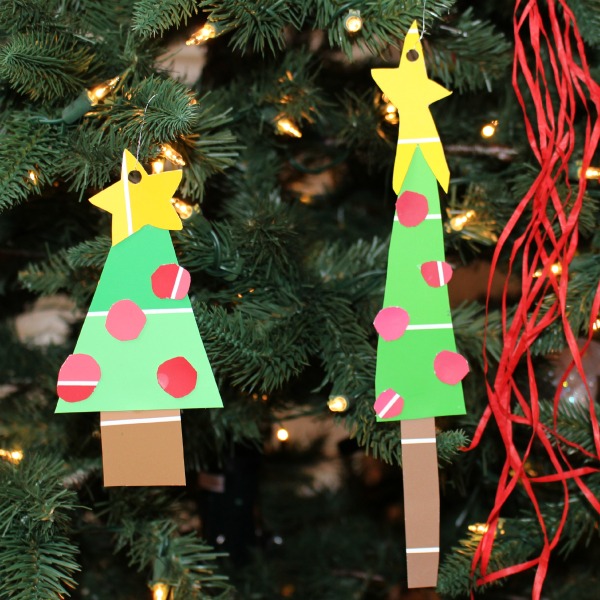
How adorable are her trees? (photo credit: Laura Kelly)

I had been wanting to make them with Emi prior to Christmas, but it just didn’t happen. So, I decided to put my own twist on them and use them in this project. (Bloggers are sometimes really big copycats of other bloggers, which is actually a form of flattery)

 Behr paint chipsWe shuffled off to pick up some Behr paint chips to use for our project. I love Behr paint. It’s what we used to paint the inside of Emi’s closet and also her room. Behr just has so many beautiful palettes to choose from. It’s probably a good idea to ask the people working in the store if it’s OK to take some paint chips for your project. They’ll most likely say “yes” and probably even ask you what you’re making with them.

paint-chip-trees
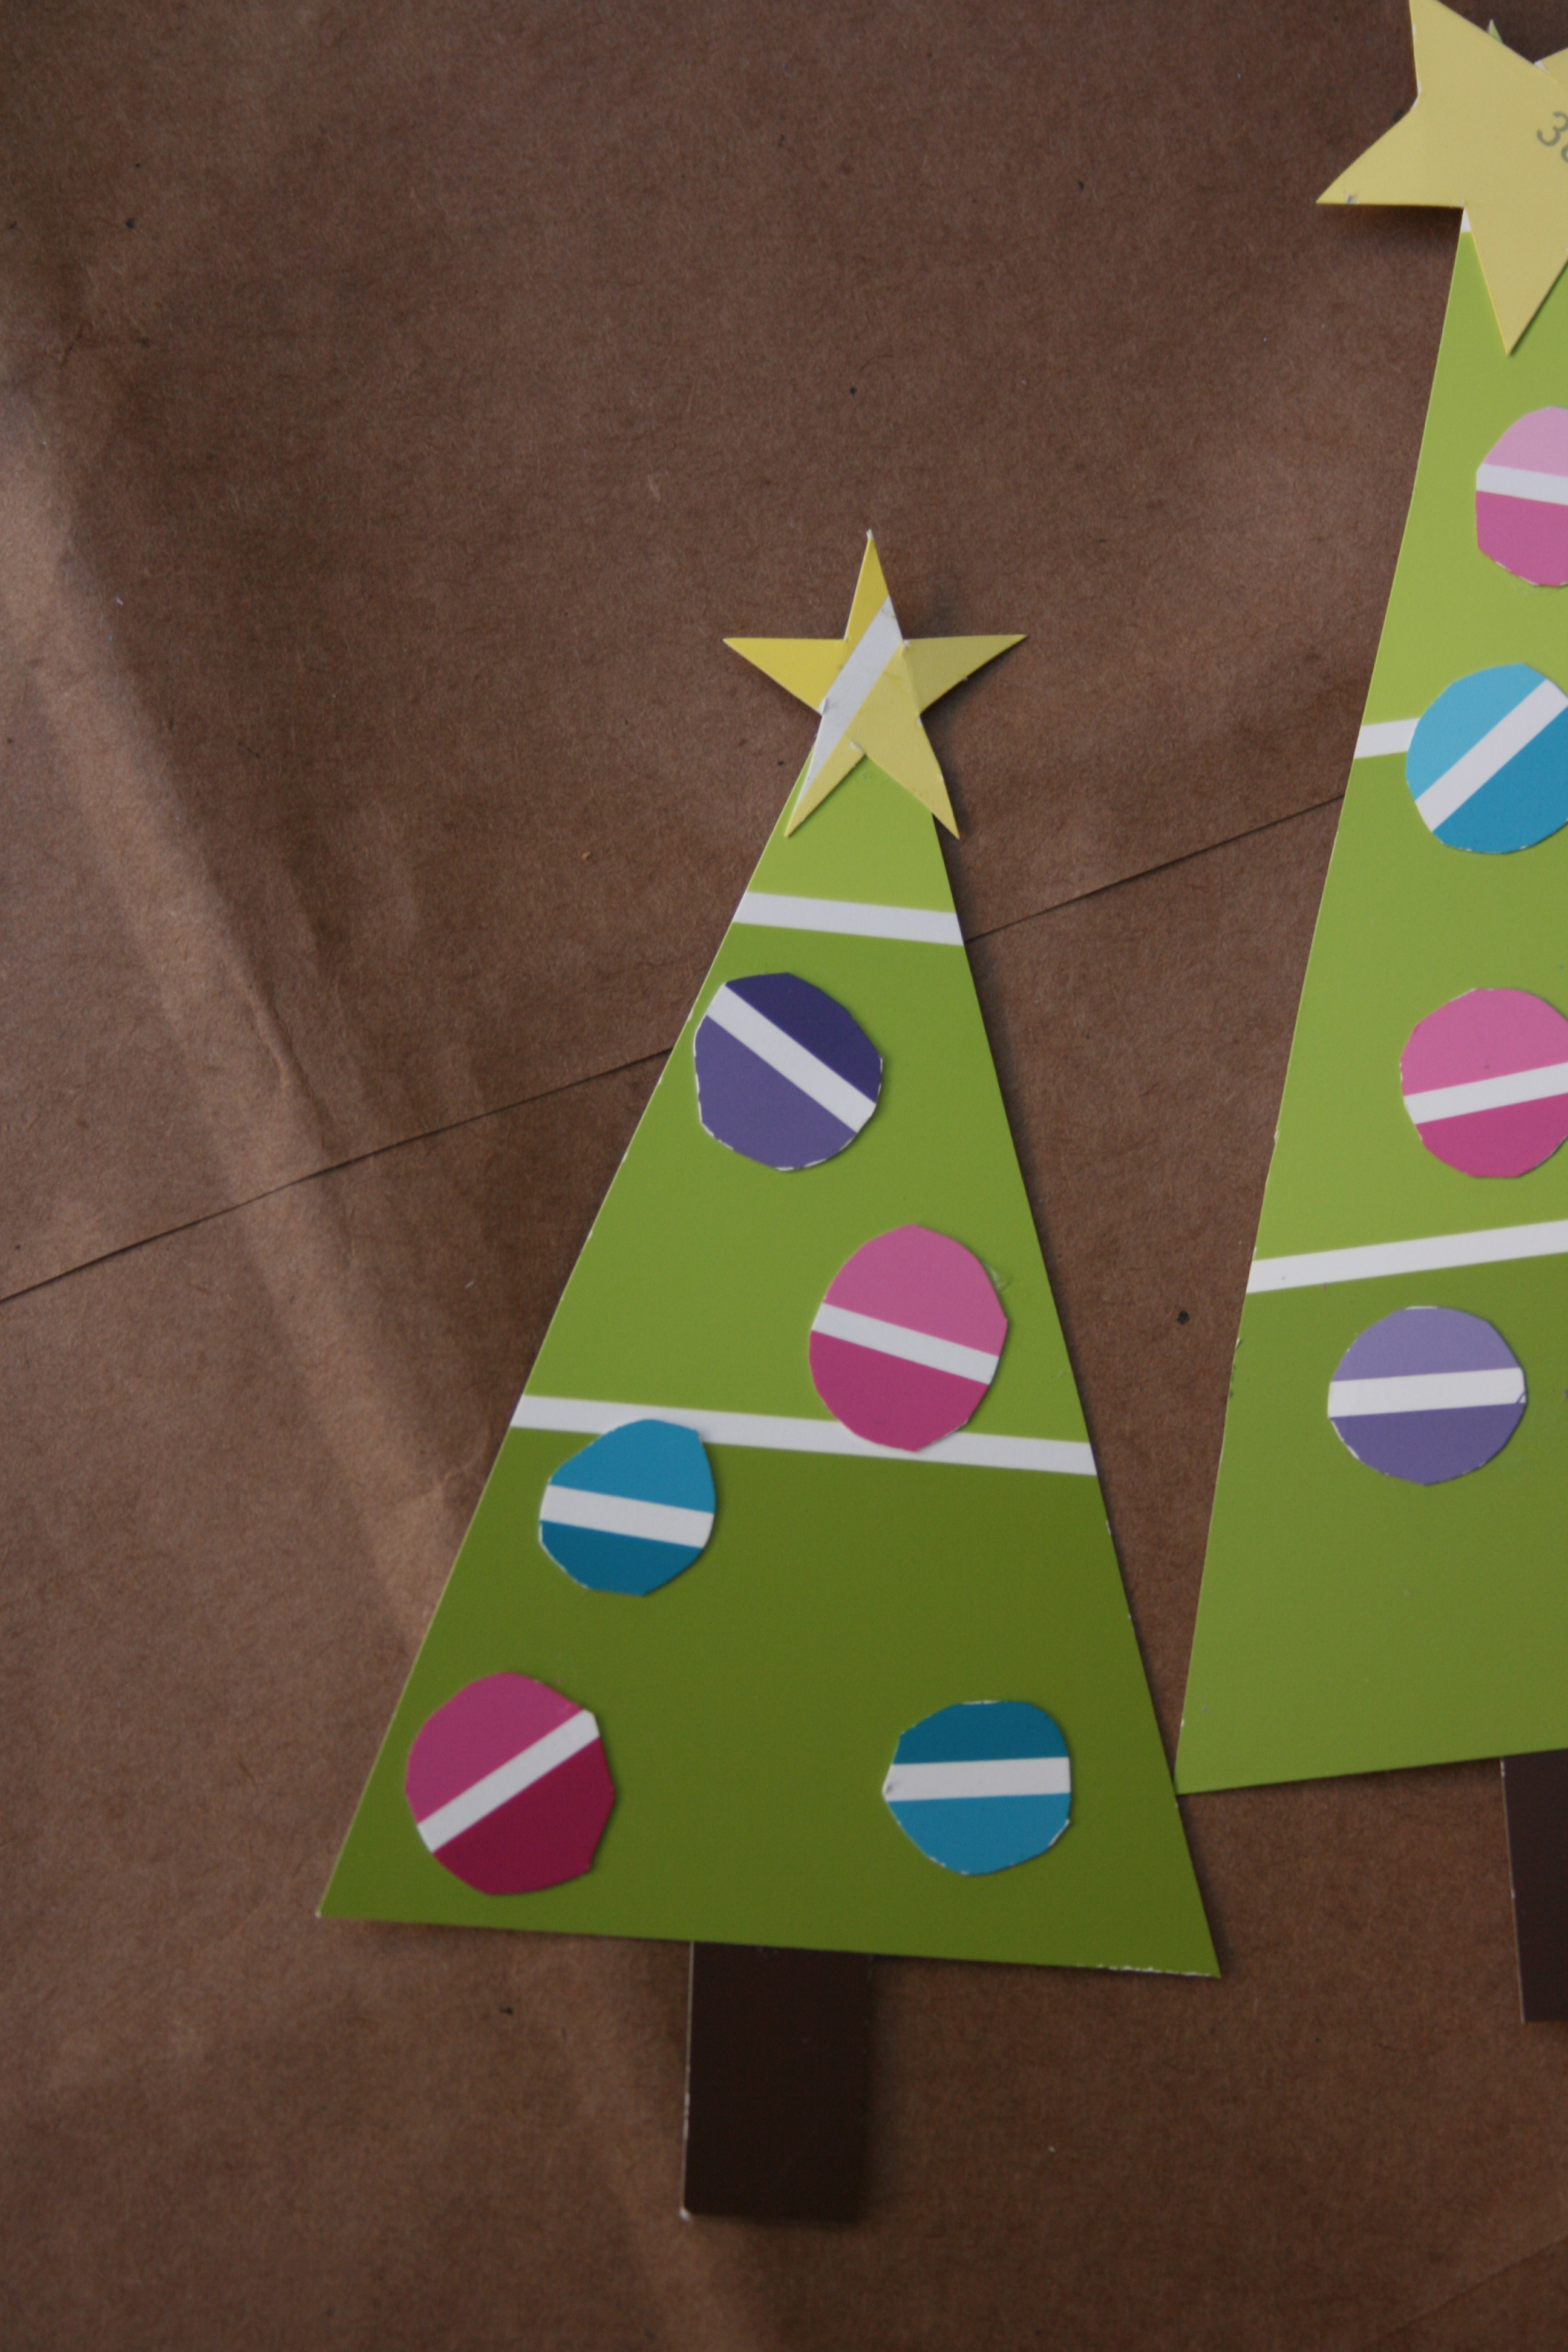
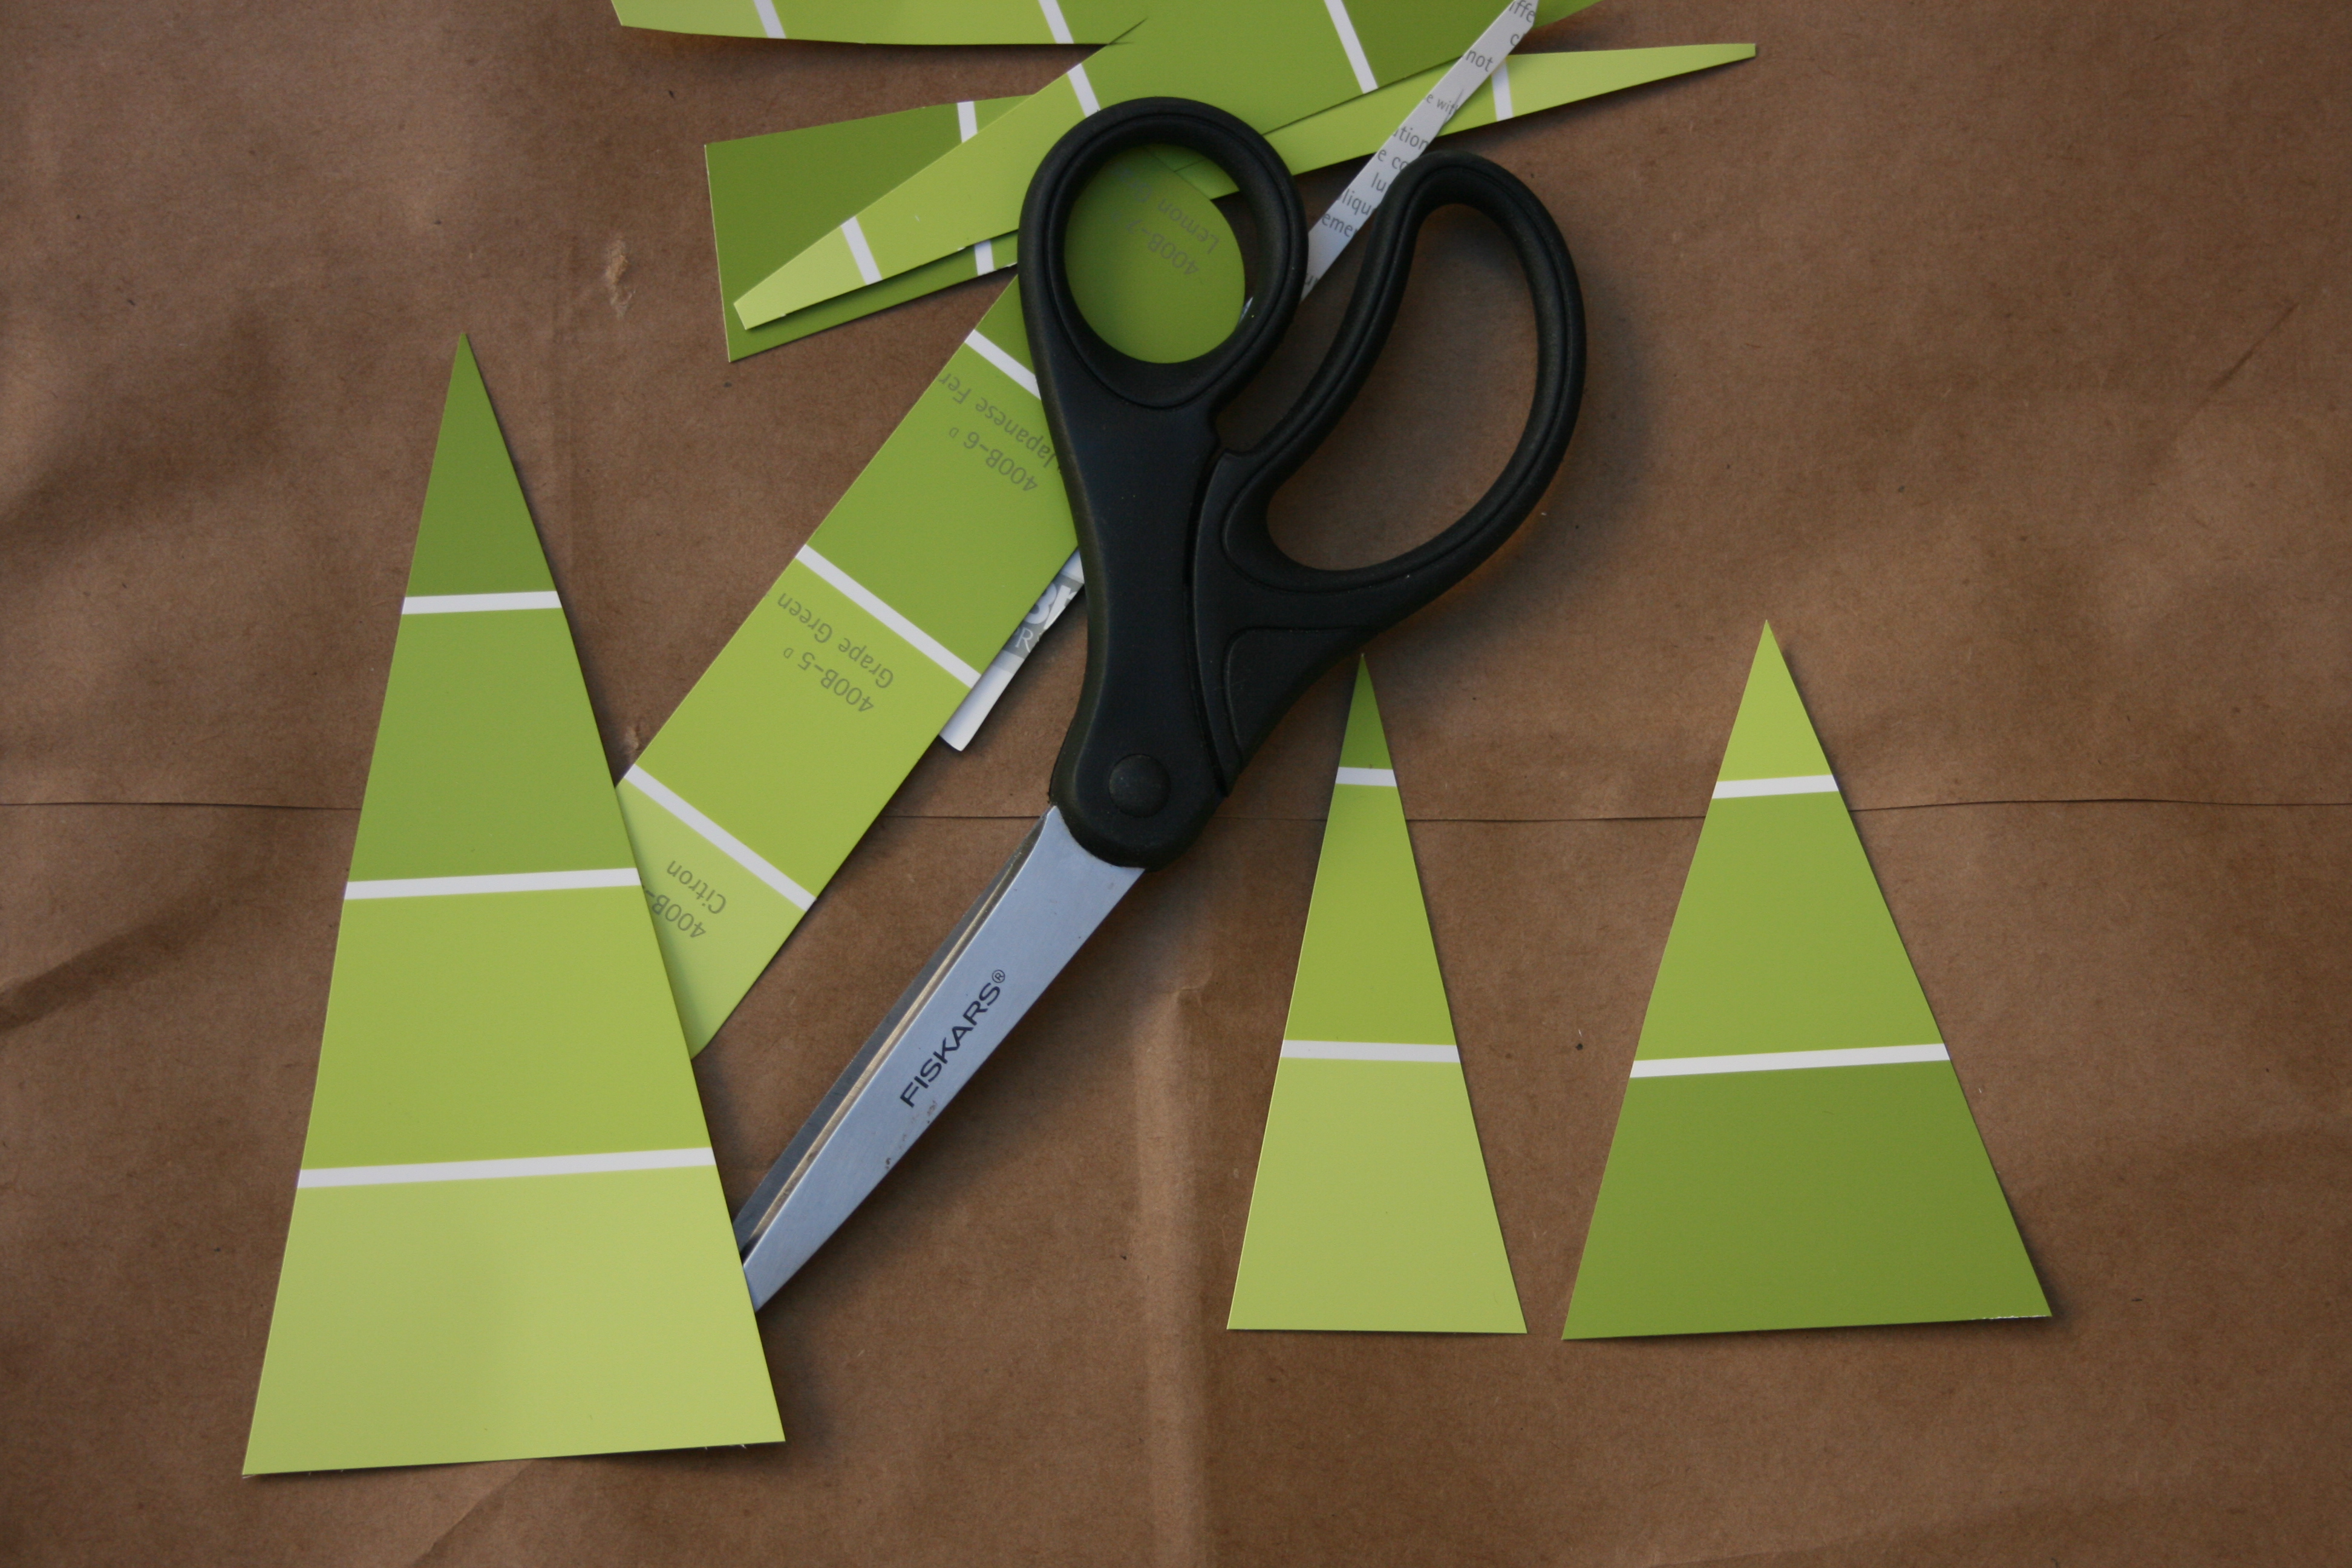
Emi and I spent the entire day, crafting in our pajamas. First we made the trees, some big and some small. It’s much easier to avoid mistakes if you draw the trees on the back of the paint chip and then cut. Our tree trunks were very simple and we only used a single hue of brown.

Behr-paint-chip-tree-trunks
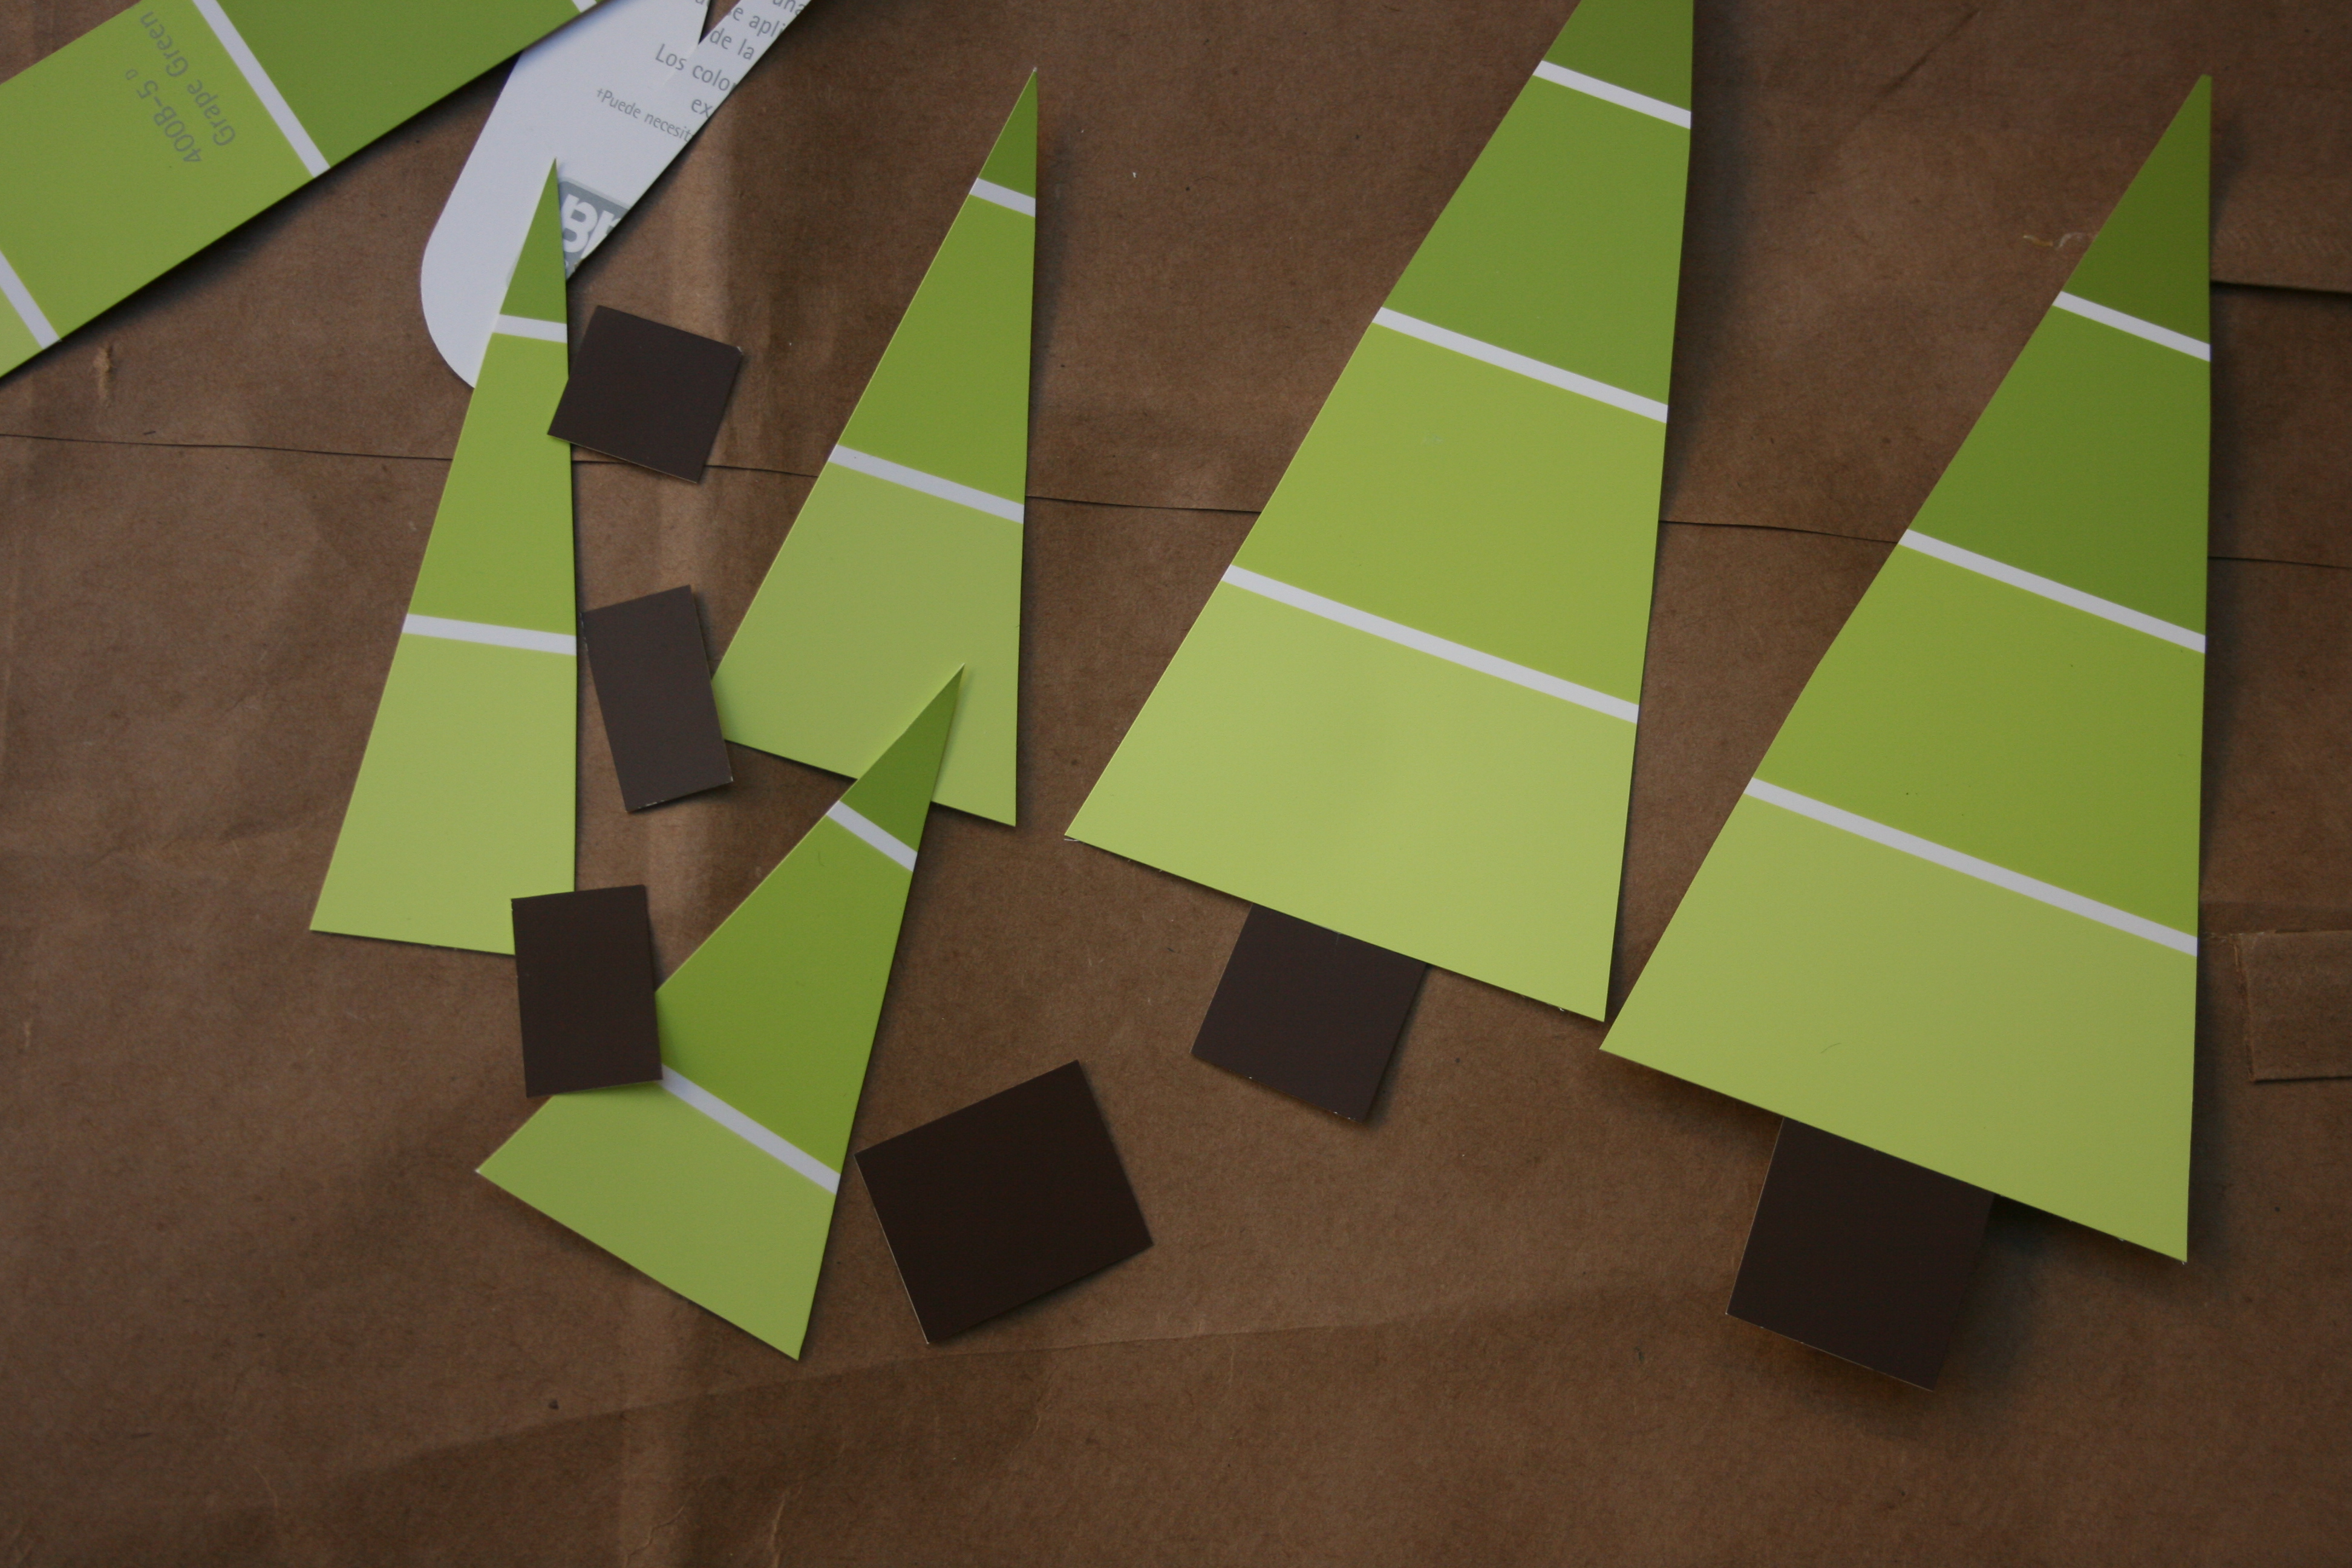
Next, it was time to make the stars for the tops of the trees. This part can be frustrating for some children (I know this from my experiences in my own first grade classroom) but for some reason, Emi loved making the stars and even “fixed” some of mine!

Behr-paint-chip-stars
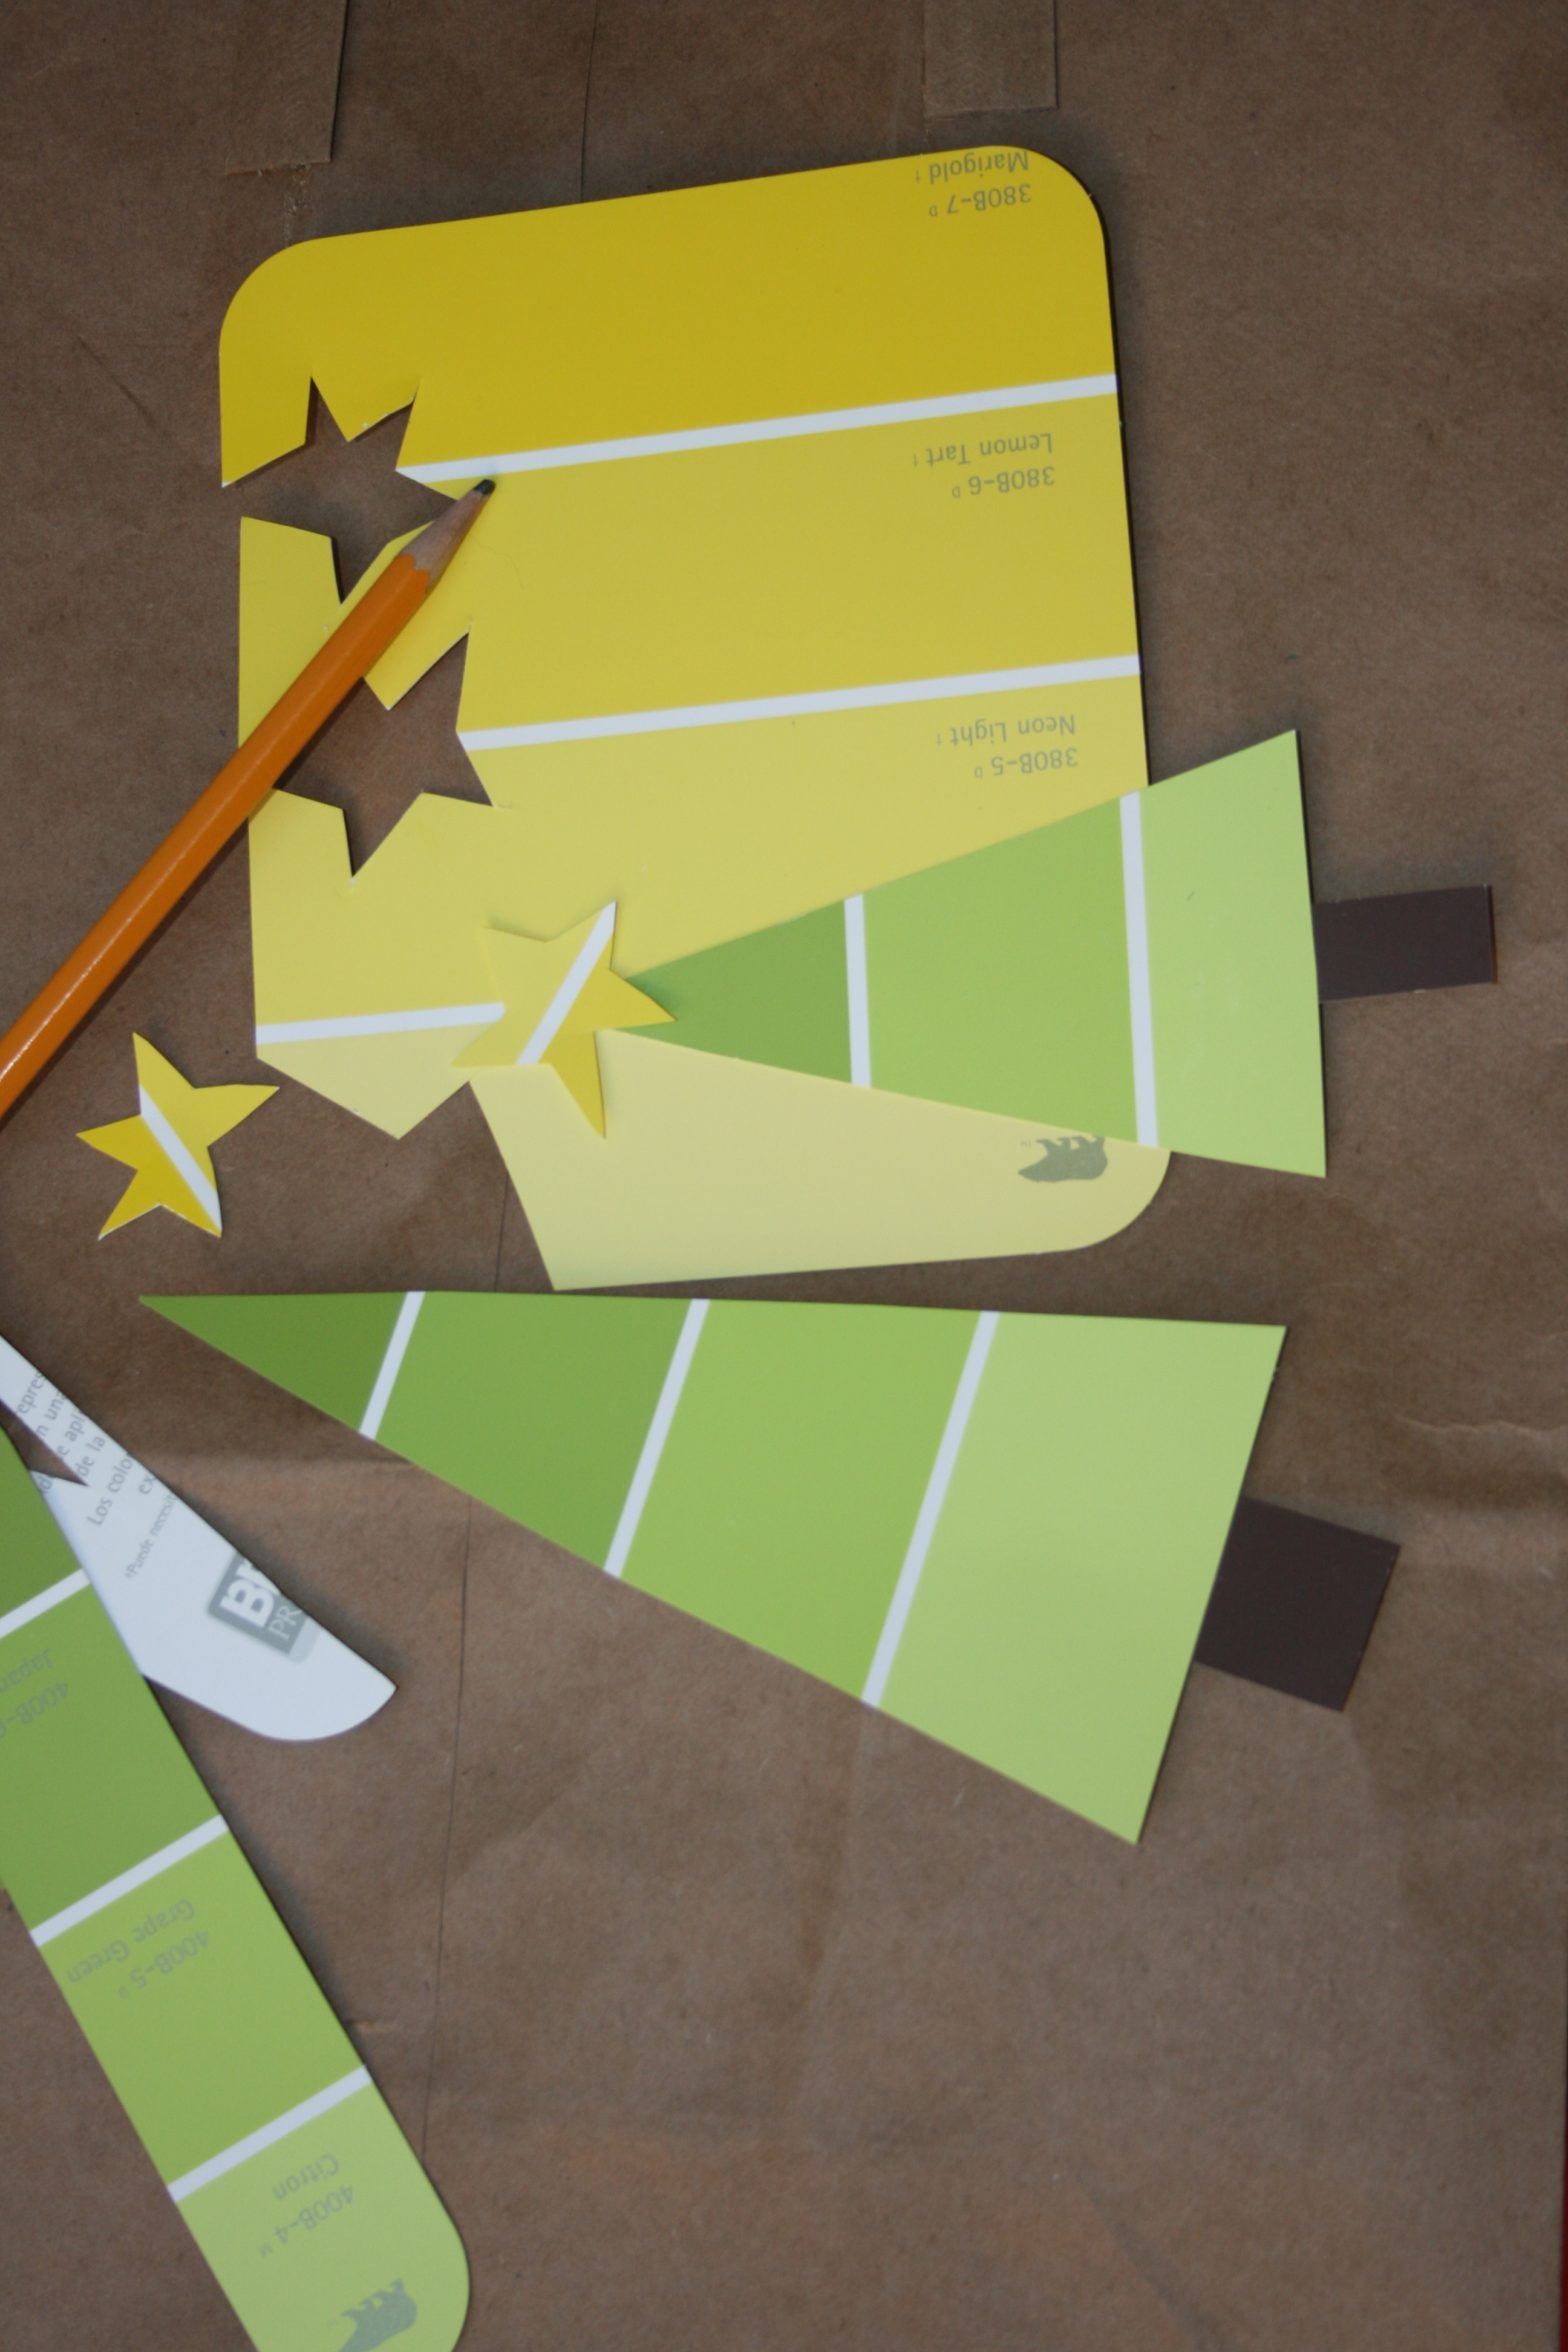
Finally, we made the ornaments. It was fun to use non-traditional colors for our ornaments, which is what our own Christmas tree has on it. You could also use a hole punch to make the ornaments into perfect circles and all the same size, but I think that hand-cut ornaments are cute because they are each uniquely shaped.

Behr-paint-chip-ornaments Behr-paint-chip-Christmas-trees
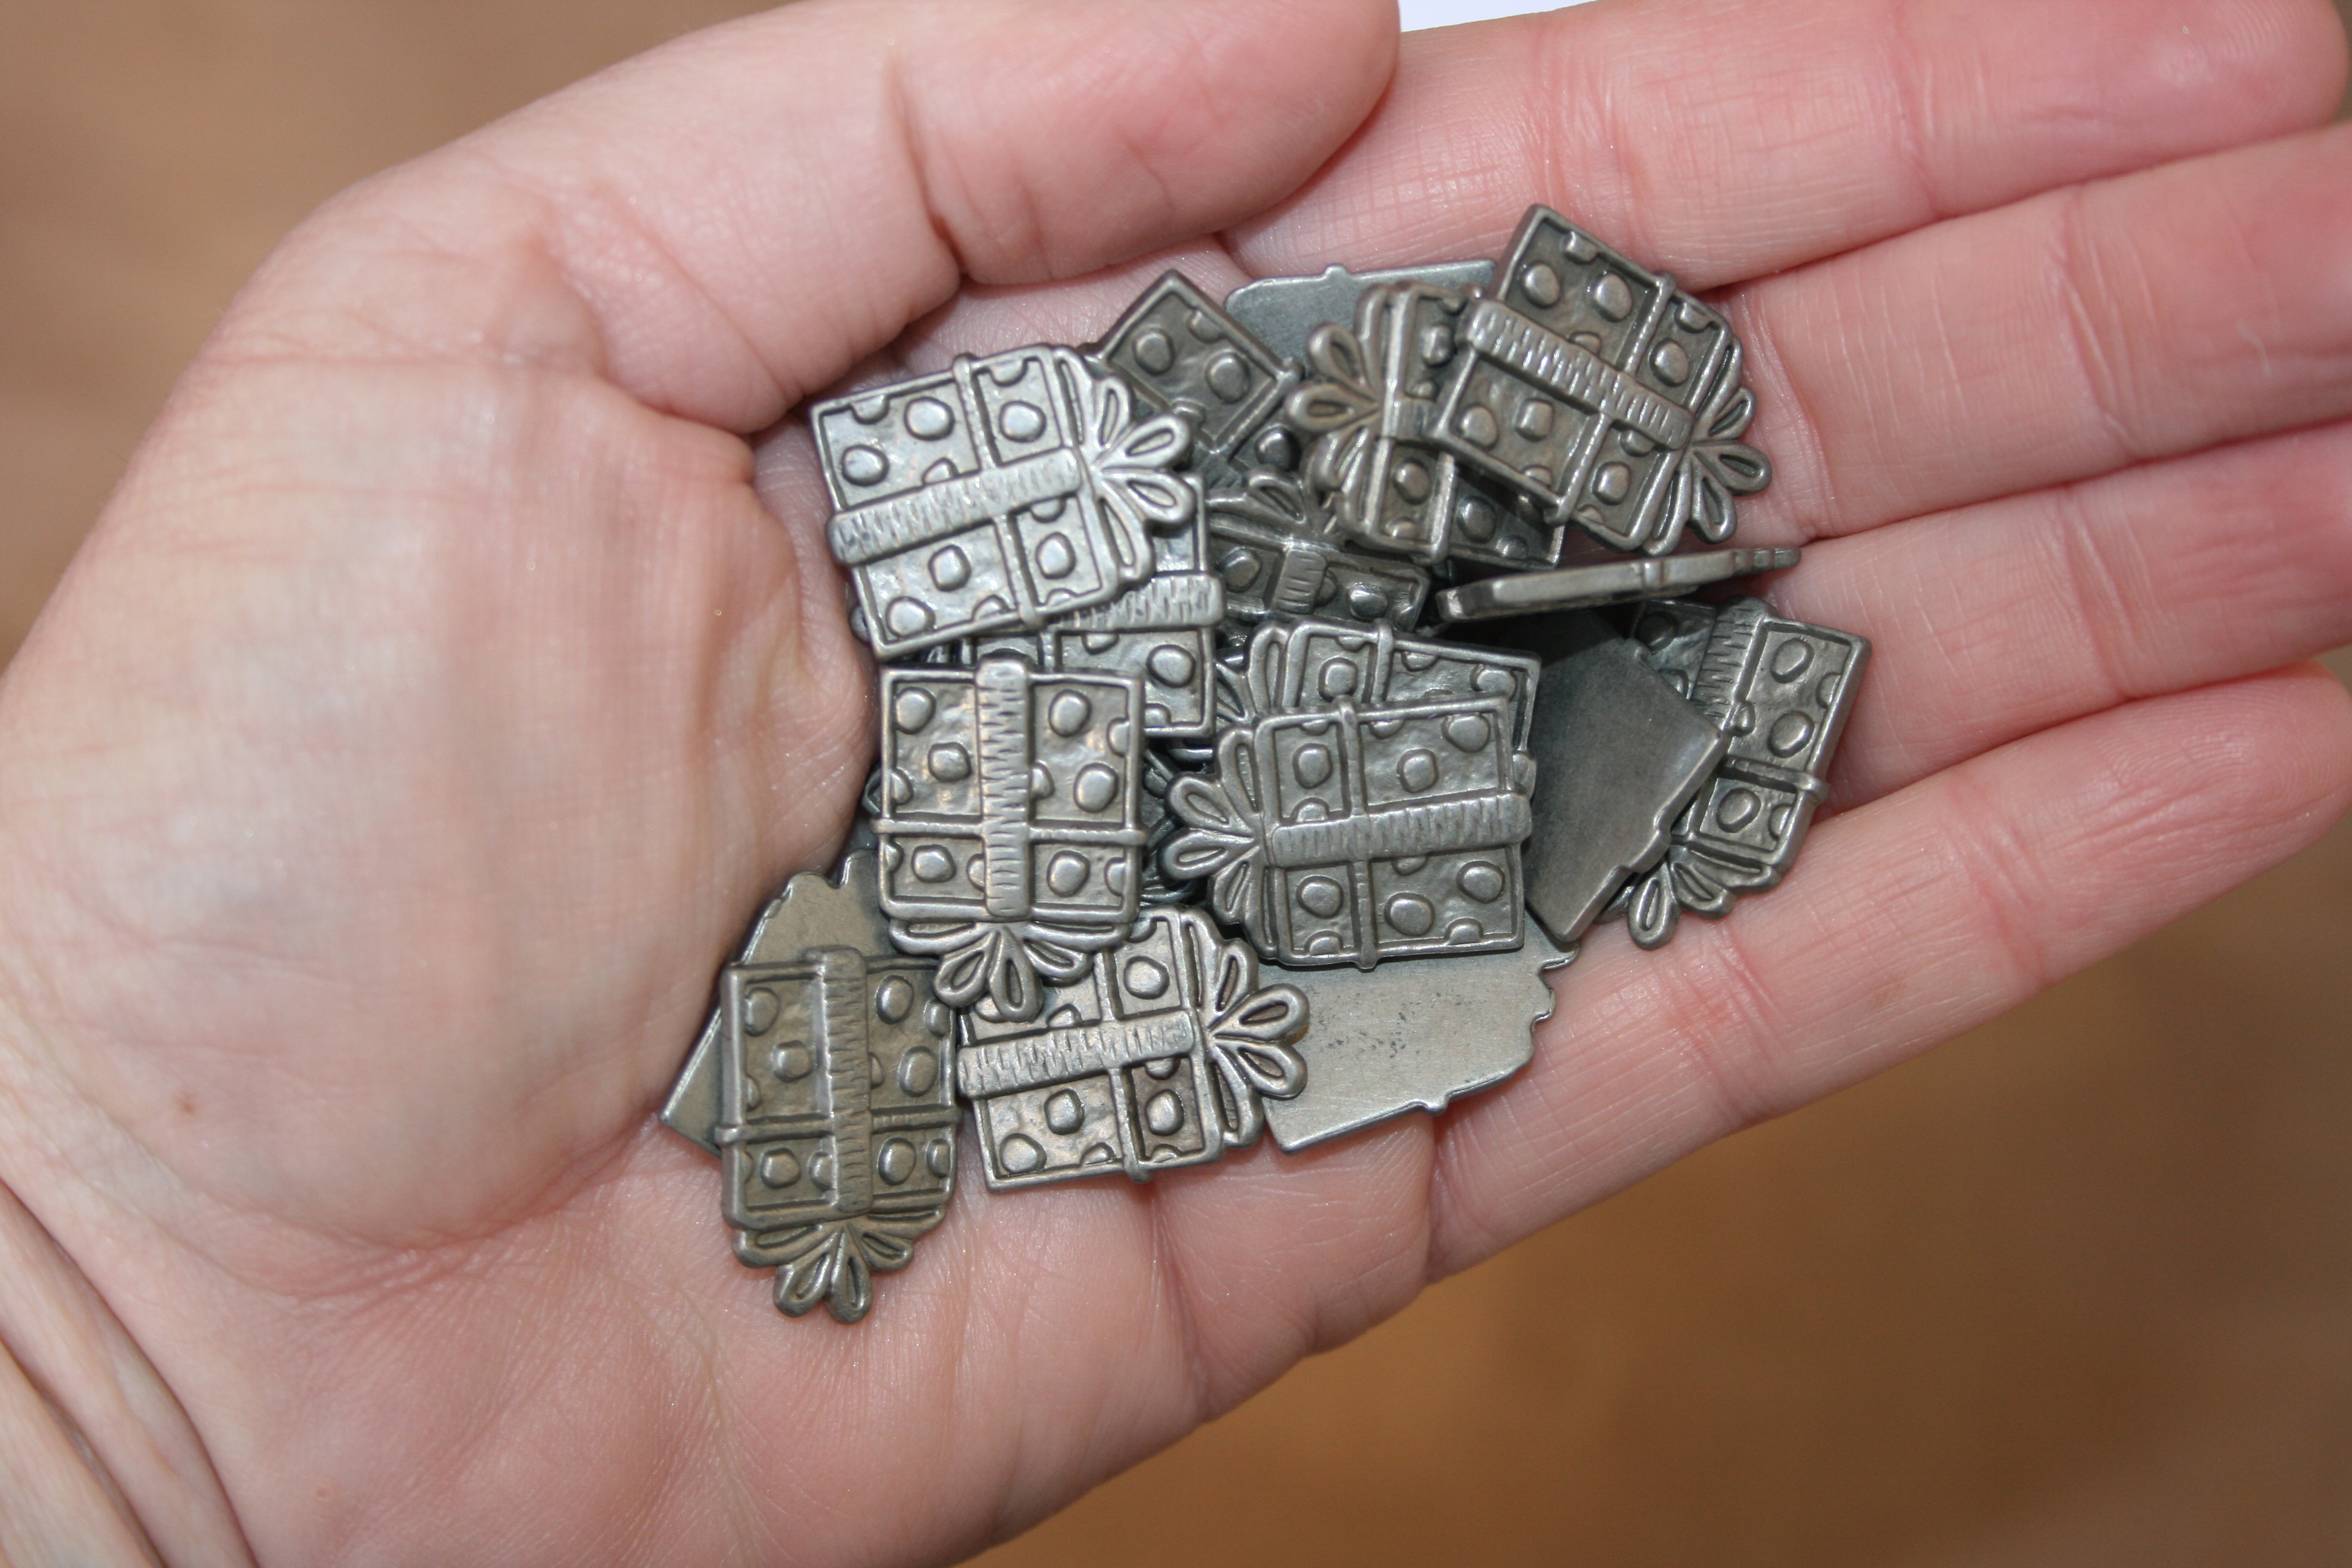
After the trees were finished, we glued each one to the front of a thank you card and used a hot glue gun to stick a little metal gift embellishment around the bottom of the tree to finish each one off.

metal-gift-embellishments
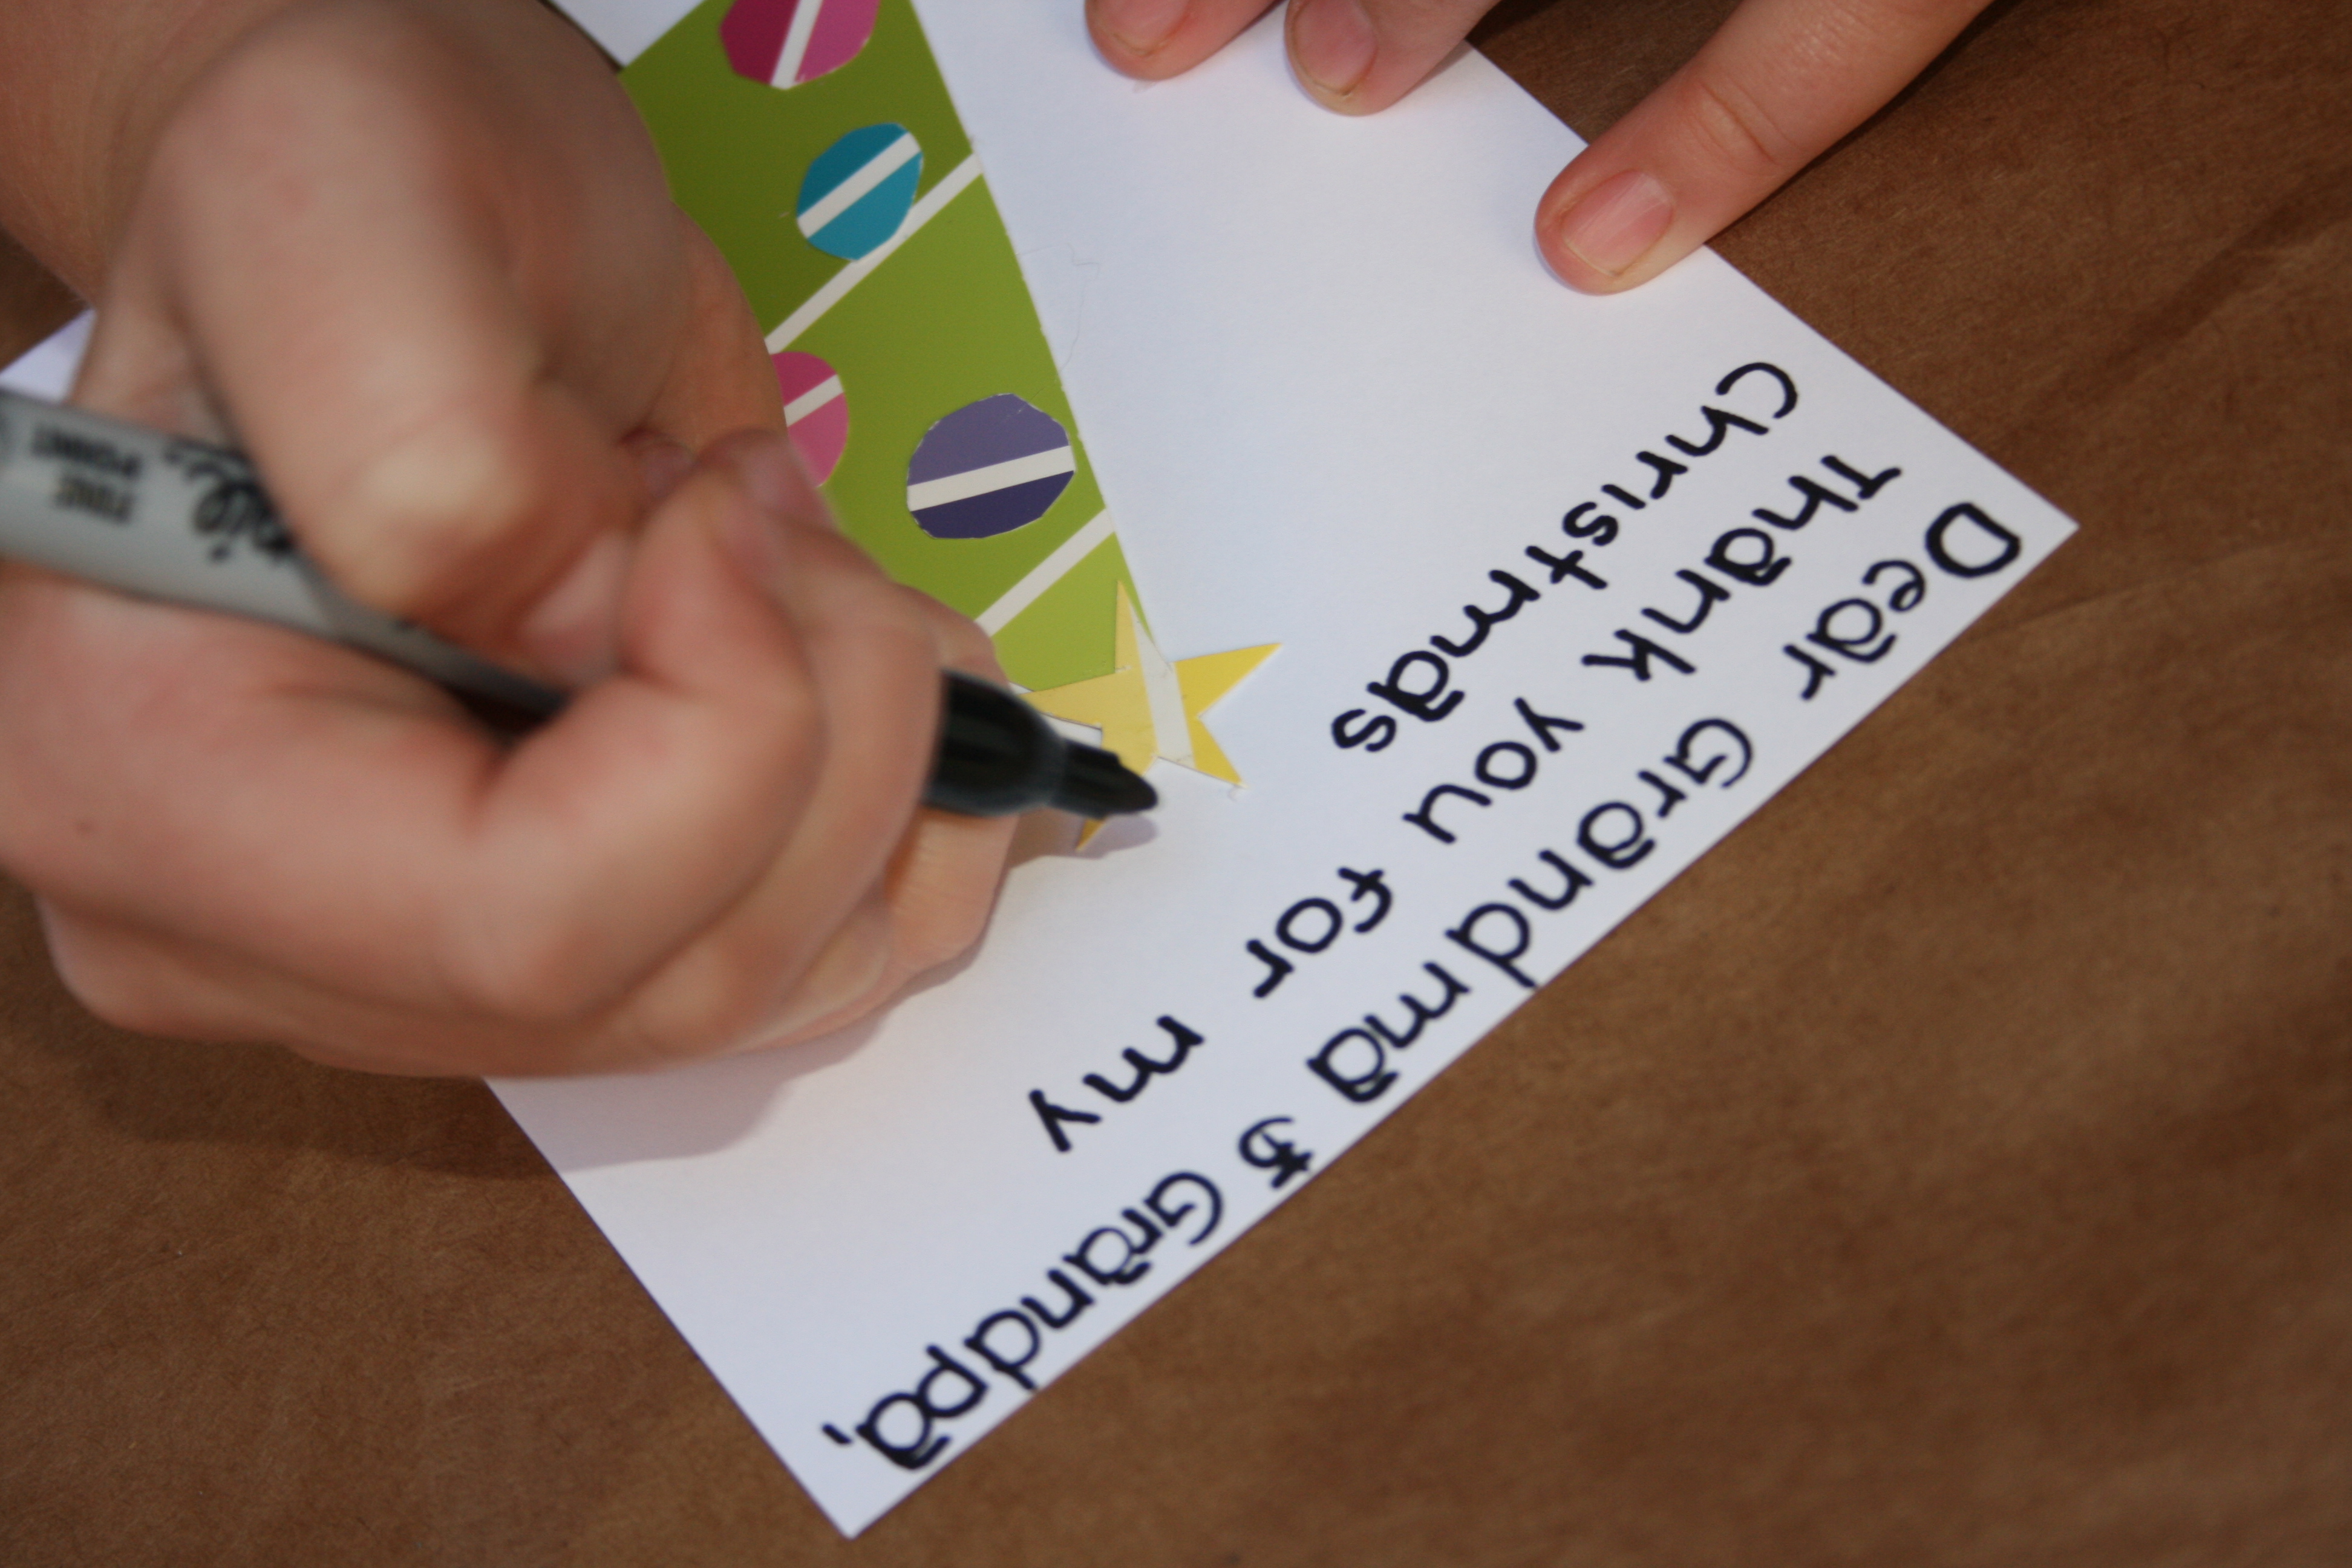
Emily then wrote her thank yous inside and we addressed them and mailed them off to lucky recipients!

thank-you-note

Behr-paint-chip-Christmas-tree-thank-you-cards
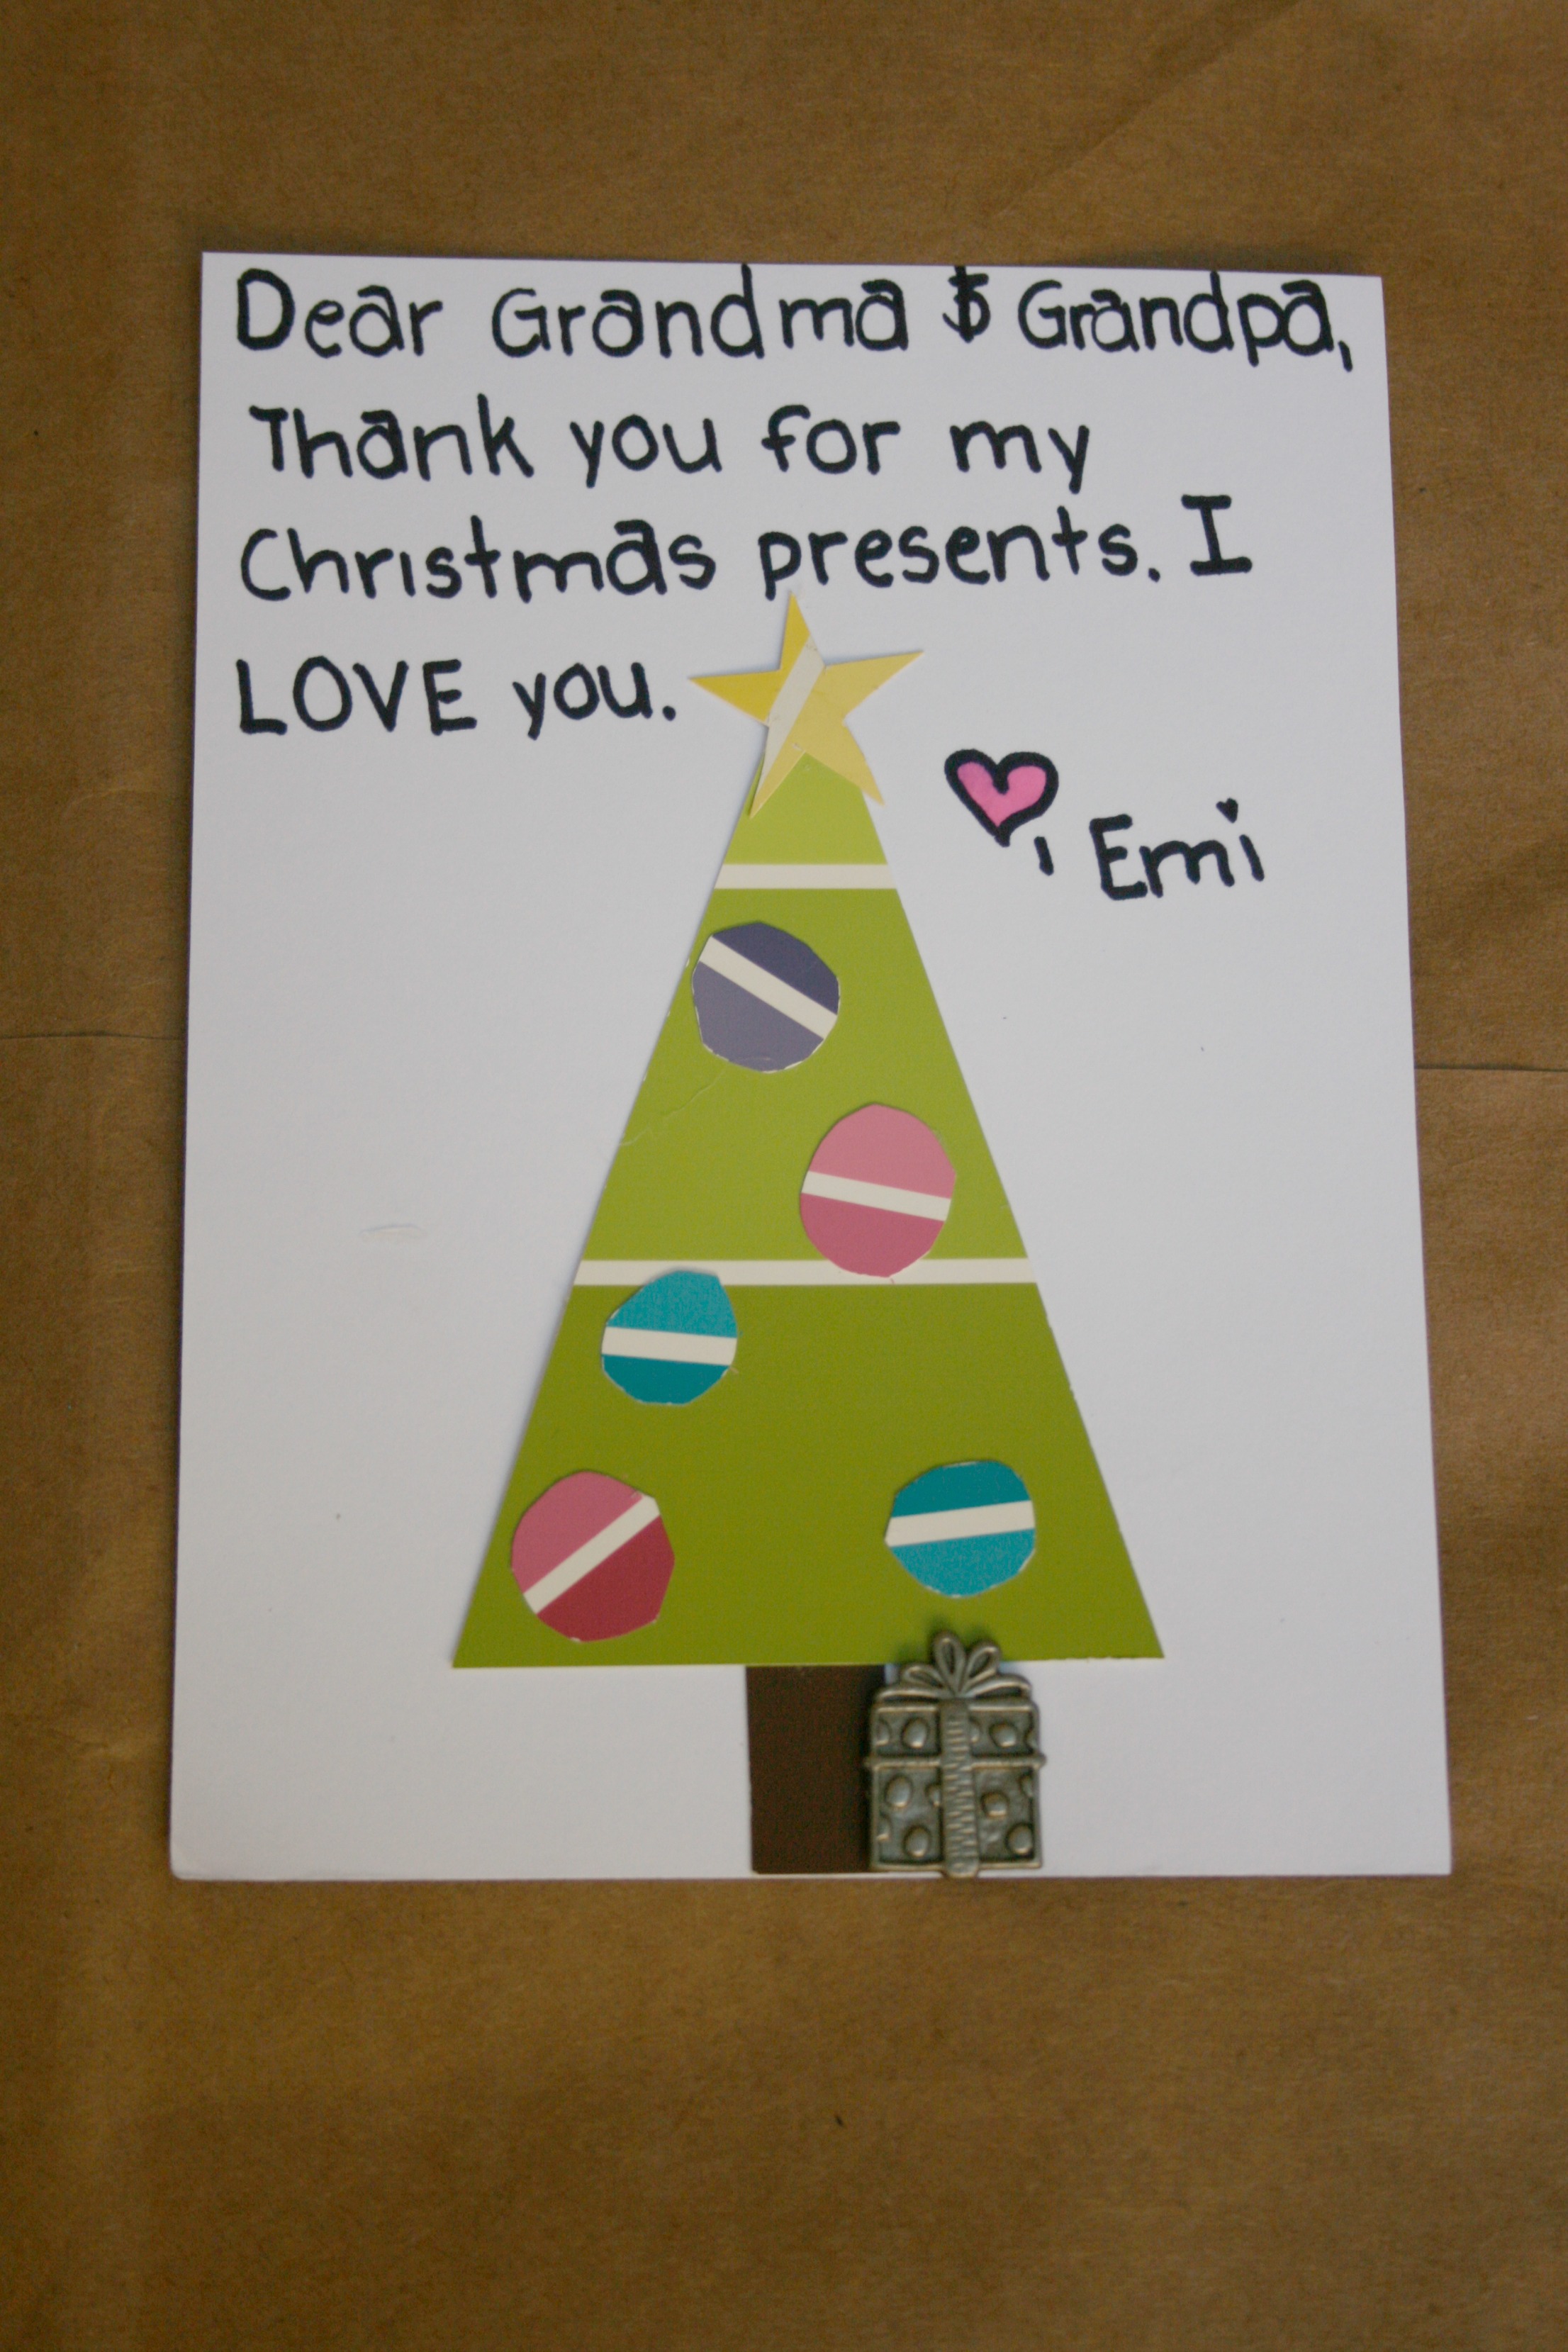
I love receiving handmade cards and handwritten notes in the mail. It’s just something about that personal touch. I recipients will treasure these little works of Emi’s art! Do YOU have your kids send thank you notes for gifts?

Learn more about Behr products here. Connect with Behr Paint Facebook, Twitter & Instagram!

This is not a sponsored post.

DIY Festive Masks for Mardi Gras

We decided to celebrate “Fat Tuesday”, this last day of Carnival (Mardi Gras), by decorating some festive masks to wear! Emi and I love anything and everything with a little bling, so when we made a stop at Hobby Lobby, we threw a big container of multi-colored rhinestones and some brightly colored feathers into our shopping cart, along with a couple of plain white masks.

 As soon as we got home, our “Battle of the Glue Guns” began!
(note: Emi is almost 9 and now uses the glue gun on her own, but only when I’m supervising her)

I think we each had a different idea in our head of how we wanted to decorate our masks. I tend to gravitate towards the pinks. Emi, on the other hand, was determined to make more of a rainbow arrangement of gems on her mask and started by gluing the larger-sized stones down to the smaller ones. She also included eyelash details on her mask.

Little did I know that when Emi finished her mask, she wouldn’t just stop there, she needed to grab one of her Barbies and get HER ready for Mardi Gras! After Barbie was done receiving a festive makeover, Emi looked at me and said, “Look Mommy, she’s ready for Barbie Gras now!

Doing something like this is so easy and quite therapeutic. It was nice for me to put aside my cell phone and my long to-do list and for Emi to procrastinate doing her homework (hehe!) so that we could just sit and talk while, we sorted and glued gems and decorated our masks. I think this kind of activity also ties in with what I blogged about in my last post, getting back to what’s really important..these moments. It makes me realize that I should UNPLUG at times like this and enjoy that moment WITH Emi! It isn’t just about letting her be a kid or having time for imaginary play or having time for being creative, but it’s also about me getting down there with her and interacting with her.  I think so often as parents, we just get our kids situated with something, like a toy, a show, or an activity, and then go do what we need to do, whether it be to wash dishes, make dinner, fold laundry or get online. We’re all so busy all of the time, that we’re missing the moments. Of course we also have to be realistic because all of things also DO need to get done, but there has to be a way to find balance and/or let some of it go, so we can focus on our kids more. End of rant.

DIY Family Thanksgiving Shirts Using the “Little Turkey” Collection

Can I just share with everyone HOW excited I am about the shirts I just finished making using the “Little Turkey” collection by Lauren McKinsey? I often have personalized shirts made at a local shop, but they’re never less than $20 and that can add up quickly if you’re making something for your whole family. I recently saw a DIY for a turkey shirt over on Lauren’s blog and thought I’d try it myself! Since Emily requested we all wear pajamas on Thanksgiving Day this year, I thought some matching family shirts would look really cute with our pj pants!
Here’s what you’ll need to make these shirts:
*tshirts that are all cotton and no stretch (you don’t need to prewash them)
*the turkey clipart image from The Little Turkey collection by Lauren McKinsey
*a pack of Avery Light Fabric Transfers paper, size 8 1/2 X 11 (It’s product 8938)
*scissors
*an iron
*a pillowcase
The first thing we did was to go and pick out our t-shirts at the store. After that, we went to Staples and bought some Avery Light Fabric Transfers. (They also sell separate ones for dark fabrics.) When we got home, I went online to avery.com/print, where you can actually find the templates that work for this product. Not only are there tutorials and tons of different areas to go for help on the site, but the templates practically walk you through the process. For our shirts, I chose a circular text for the top and then regular text for underneath the turkey. I also chose the “Ashley Crawford” font, but there are many to choose from. After doing all of the text parts, it was time to insert the turkey image into the template.  I had the collection already saved on my computer, so in the template when I clicked on “images”, I then clicked on “from my computer” where I found the turkey clip art to insert into this template. After I was content with my image, I saved it onto my computer, as well as in my avery.com account. (You can register an account at that point.) The instructions recommended printing out a test copy on regular paper first. This is a good idea because then you can see if it’s the right size for the shirt you’re putting it on. If I were to make these shirts again, I think I would’ve made the image and text a little bit bigger. After printing out your test page, you’re ready to print on the fabric transfer paper. The one I purchased was recommended for Ink Jet printers. Next, you need to trim around them pretty closely. Then the directions tell you to take all of the water out of your iron (it says NO steam) and then to locate a surface you can iron on.  The directions say that you SHOULDN’T iron on an ironing board, glass, granite, concrete or heat sensitive surfaces. I just chose to iron mine on the kitchen table. First, you have to iron the shirts, themselves, and then you have to iron a pillowcase, which you’ll be using underneath the shirts when you iron on the images. After setting the fabric transfer FACE DOWN where you want it on your shirt, you start to iron back and forth over it, applying firm downward body pressure. There are specific amounts of time recommended on the directions, depending on how big of an image you’re using. After ironing, you remove your garment from the heating area and let it cool down for about 2 minutes. Finally, you begin to peel the paper backing from the transfer to reveal your fabulous, new holiday shirt! (see directions for washing guidelines)

This was the color Emily chose. Here, I’m peeling back the paper. So cute! 
I definitely feel like the image pops more on a white shirt! I love both options though.

I am just amazed at how easy it was to do! I feel like I want to transform everything now with these fabric transfer papers! To check out the entire “Little Turkey” collection, click here!

Happy Thanksgiving! 


DIY Glitter Shoes Using Mod Podge

I cannot tell you how many pairs of my daughter’s perfectly good shoes have had the toe area ruined by what seemed like just a few wears to school! I don’t know what exactly kids are playing at recess these days, but it can sure be frustrating for me to either 1) send Emi to school wearing shoes that look worn out or 2) keep having to buy her new school shoes every month. Let me show you what just a couple of supplies can do to transform scuffed up shoes into beautiful glittery ones!
Here’s the supplies you’ll need:
*a bottle of Mod Podge (I buy mine at Michael’s)
*a container of glitter (Since Emi’s favorite color is blue, I chose a pretty aqua blue glitter.)
*a roll of painter’s tape. (I like 3M brand. The skinny width is easiest to use for this project.)

The first thing you need to do is tape up the shoes around the area you’ll be adding glitter to. Don’t forget to do part underneath the glittered area too, which is part of the sole.
Next, apply a coat of Mod Podge to the exposed area with a paintbrush.
 After this, sprinkle glitter over it while it’s wet, shake off  the excess glitter, and allow it to completely dry for about 12 hours.
At this point you’ll need to apply another coat of Mod Podge, this time over the glittered area and again, allow it to completely dry for another 12 hours. **VERY IMPORTANT I forgot to take a picture of this part, but don’t forget to do this 2nd coat!
Afterwards, remove the painter’s tape and the shoes will be ready to wear!

How cute did these turn out? I feel like one of Cinderella’s step sisters, trying to cram my own feet into them so I can wear them!
 The entire project was so simple and I think these are Emi’s new favorite pair of shoes!

Now I’m wanting to make a pair for ME! What color glitter do you think I’ll choose? If you know me well enough, you’ll easily answer that question! 

Home Depot Kids Workshop

In our family, we LOVE going to the Home Depot Kids Workshop every month. These events are held at any Home Depot, are free of charge, and are a great hands-on experience. They’re recommended for children between the ages 5 and 12 and give children an opportunity to build a project by assembling, painting, and often using stickers as the final touch. I already have the 1st Saturday of each month marked on each of my pocket calendar pages, as well as my iPhone calendar. We try to be there right at 9 a.m. sharp because Emi always wants to be the first one! Workshop hours are 9 a.m. until 12 noon.

Emi loves wearing her own personalized, Home Depot apron to the event because, well, she IS my daughter and always needs to dress for the theme or the occasion! (I think I’ve taught her well.) If your child doesn’t have one yet, they can also get one on the day of the event AND put their name on it.

All children receive a special themed pin that matches the project to add to their apron, as well as a certificate of achievement for EACH monthly Kids Workshop that they attend!
Click on the link here to see what the next scheduled workshop is going to be and register!

If spray painting is wrong, then baby I don’t ever wanna be right!


This morning I was staring at this sad little silver(ish) cake stand I’ve had sitting in the middle of our kitchen table, which holds random stuff.  I actually bought 2 of these on clearance at Target last year after Christmas, so I decided to give this one a mini makeover! 
I bought this can of spray paint at Michael’s. You don’t NEED a primer coat for something like this.  Always make sure to put out some newspaper or something underneath it, before spraying. The best way to cover it is by using short sprays and not just holding down the button. Sometimes there’ll be areas that aren’t completely covered but you can go over them a second time and they will be. 
 After spraying it, I left it outside to dry for a few hours. When it was dry I put back on the table. It’s going to dress up our craft table for tomorrow’s little girls craft night!